Pages Navigation Bar

Tuesday, June 28, 2011

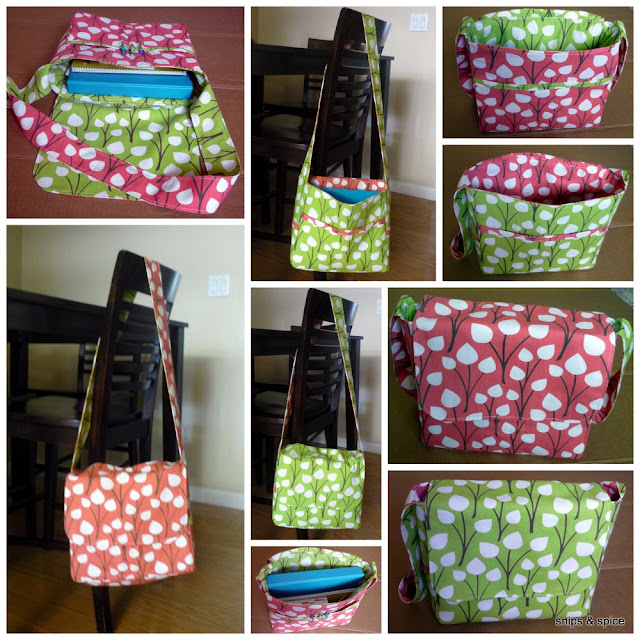
The (reversible) School-Time Messenger Bag

Sewing tutorial for making a reversible messenger bag
Do you remember when I went to Utah in March?  While I was there, I made this cute bag with my cousin Hannah (her friend Tess also made one).  I promised to post a tutorial explaining how to make the bag, but alas, it turns out that I do not take helpful pictures when I am helping two teenagers create something.  I know it has been months, but I finally remade the bag, and have the complete tutorial for you!

Supplies
    soft and stable
  • Scissors
  • Rotary cutter and mat (optional, but so helpful)
  • Sewing machine & thread
  • Pins
  • 1 yard decorator's/indoor canvas (one side)
  • 1 yard decorator's/indoor canvas (other side)
  • Soft & Stable (for the bag body) - this is optional, but it is a great product.  It is lighter than batting, and more stable.  You could use batting, or if you want a floppier bag, don't line it with anything.
  • Iron & ironing board
  • Pencil/pen
  • CD or DVD
  • Ruler or measuring tape
Directions
***unless otherwise stated, the entire pattern uses 1/4 inch seam allowances***
***these directions pertain to directional fabric; if yours does not have a direction, you can ignore directions***
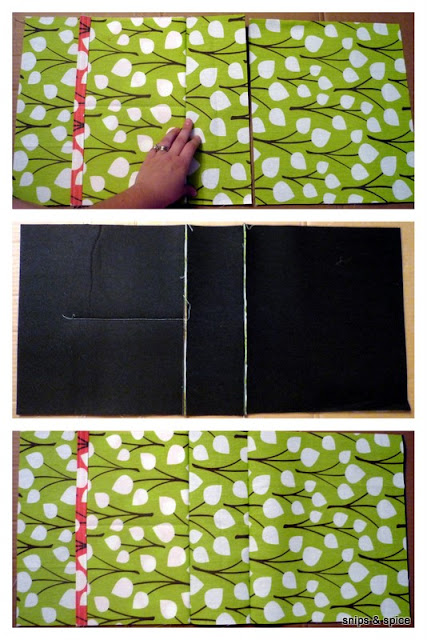
  1. Begin by cutting each of your fabrics into the following sizes (the picture is to help people with directional fabric):
    1. Sewing tutorial for making a reversible messenger bag
    2. 13 x 11.5   front (cut 1 soft and stable)
    3. 13 x 11.5   back (cut 1 soft and stable)
    4. 4.5 x 11.5  sides (2) (cut 2 soft and stable)
    5. 13 x 11.5   flap
    6. 4.5 x 13     bottom (cut 1 soft and stable)
    7. 4.5 x 5.5    side pockets (2)
    8. 4.5 x 7       side pocket liners (2)
    9. 13 x 7.5     front pocket
    10. 13 x 9        front pocket liner
    11. 3 x 43       strap
  2. Make your strap.  Stack the straps right sides together and sew along both long sides.  Flip right sides out, iron, then sew 1/4 inch from the edge along the long sides again.
  3. Make your pockets.
    1. Sewing tutorial for making a reversible messenger bag
    2. Match your side pockets and side pocket liners.  The pocket liners should be 1.5 inches taller than the pockets.
    3. Stack and pin your pieces along the shorter side right sides together so that the top of the pocket matches with the bottom of the pocket liner.
    4. Sew pocket and liner together.
    5. Iron the seam allowances toward the pocket liner.
    6. Fold the pocket on top of the liner to match the bottom corners of the liner and the pocket.
    7. Iron them flat.
    8. Top stitch along the top of the pocket to stabilize.  I stitched two rows of top stitching for decorative effect.
    9. Repeat the process with the front pocket sewing along the longer edge this time.
    10. Sewing tutorial for making a reversible messenger bag
    11. When you are finished you will have all of the above pockets.
  4. Make your flap.
    1. Sewing tutorial for making a reversible messenger bag
    2. Trace your cd/dvd on the two bottom corners of each of your flap pieces.
    3. Cut the corners so they are round.
    4. Stack the two flap pieces right sides together.
    5. Sew around the sides and bottom edges - leaving the top open.  Clip around the corners.
    6. Flip inside out, iron, and sew 1/4 inch from the edge for the three sides you just sewed.
  5. Sew together bag body.
    1. Stack in the following order: the front piece of soft and stable, the front fabric right side up, the front pocket right side up, the bottom fabric right side down, the bottom soft and stable.  Sew together.
    2. Sewing tutorial for making a reversible messenger bag
    3. Mark down the center of the front pocket, then sew down to create two smaller pockets.
    4. Sewing tutorial for making a reversible messenger bag
    5. Sew bag back onto the bag body by attaching to the bottom.  Stack the bottom (soft and stable with bottom fabric), back fabric, and back soft and stable, then sew.
    6. Sewing tutorial for making a reversible messenger bag
    7. Sew the sides to the front of the bag (remember to include the pockets and the soft and stable). 
    8. Sewing tutorial for making a reversible messenger bag
    9. Sew the sides to the back of the bag.  You will have an opening at the bottom of each side.  Pin sides to bottom, and sew a straight line to close the opening.
    10. Sewing tutorial for making a reversible messenger bag
    11. Repeat entire process for the other bag fabric (minus the soft and stable).  For the sake of this tutorial, we will call this the lining from now on, but understand this is not actually lining since the bag is reversible.  I sewed three lines down the front pocket of this one to create pen/pencil pockets.
    Sewing tutorial for making a reversible messenger bag
  6. Sew the flap to the bag body with the soft and stable.  I sew just a little less than 1/4 inch seam allowance to ensure this seam does not show when the two sides are sewn together.
  7. Sewing tutorial for making a reversible messenger bag
  8. Pin the strap into the bag body.  Be sure to not twist the strap when you pin.
  9. Sewing tutorial for making a reversible messenger bag
  10. With the bag right side in, place the lining right side out inside the bag and pin together around the top.  Be sure to catch the straps in the pins and make the pockets line up on the same side.  Sew around the top leaving a gap at the back to turn the back right side out.
  11. Sewing tutorial for making a reversible messenger bag
  12. Turn the bag right side out, then pin around the top. 
  13. Sewing tutorial for making a reversible messenger bag
  14. Sew 1/4 inch around the top to stabilize the bag--be sure to catch the opening and sew it shut when you sew around the top.

Sewing tutorial for making a reversible messenger bag

Monday, June 27, 2011

Streamer Bow

Tutorial for making a streamer bow for hair.
Well I am back from cheer camp, and we had a great time!  Besides the zebra bows, we wore two different sets of streamer bows.  These are fun, easy, and quick to make.  Consider them the next time you are making bows.

Supplies
  • 3 sizes of ribbon (you can use whatever kind and size you want, but I recommend using at least some grosgrain ribbon for body and structure).  For the pink one, I used a 2.5", 7/8" and 3/8" ribbon, and for the camouflage, I used 7/8", 5/8" and 3/8" ribbon.
  • Scissors
  • Hot glue and gun
  • Measuring tape
  • Hair tie
  • Fray Check
Directions
  1. Cut the ribbons down to size.  Cut the largest width ribbon 1/4" longer than the medium width ribbon, and the medium width ribbon 1/4 " longer than the thinnest ribbon.  I cut the pink bow ribbons 13", 12.75" and 12.5", but the camouflage I cut 14", 13.75", and 13".
  2. Trim the ends so that they have the double point.  Fold the ribbon in half length-wise, then clip at an angle.  Dab Fray Check on the end of each ribbon to prevent fraying.
  3. Cut about 4-5" of the medium and small ribbons to create your center knot.  Stack one on top of the other, and tie in a knot.  Fray check the ends.  (If you are making multiple bows, cut a longer length of ribbon and tie all the knots at once--it is easier)
  4. Place a dot of glue on the center of the widest ribbon, then stack the medium ribbon on top of it.  Repeat with the smallest ribbon.  Glue the center of the knot to the center of your stacked ribbons.
  5. Place a dot of glue on the back of your ribbons in the center.  Stick the hair tie in the glue dot.  Glue and fold the sides of the ribbon so that both ends of the ribbon knot meet.

Saturday, June 18, 2011

Dry Colorado Weather

This is a Sponsored post written by me on behalf of Walgreens for SocialSpark. All opinions are 100% mine.

Although we recently had a bought of rainy weather, Colorado seems to be heading back into its normal dry routine.  In this spring weather, I battle dry skin, hang-nails, eczema, and allergies. 


If you remember back to March (when I took a little blogging break), I went to Utah to visit my family. While we were out there, I had an allergic reaction to something and ended up with a large rash that took over the lower half of my face, my neck, and my upper chest.  I was covered in itchy little bumps.  Whenever my eczema flares up, I used hydrocortisone cream to hydrate, sooth, and nourish my skin, so I lathered myself with Walgreens Brand Maximum Strength Hydrocortisone 1% Anti-Itch Ointment.  The itching ceased almost immediately and the rash disappeared in a few days. .  The itching ceased the


Most people are feeling the money crunch these days, and I like to save whenever I can.  Adam and I try to use store-brand products whenever possible, and with Walgreens products, I know we will never be disappointed.  Walgreens Brand Health and Wellness Products are pharmacist recommended, have 100% satisfaction guarantee, and usually contain the same active ingredients as those in other national brands.  Visit the Walgreens website for more information.Walgreens Brand Health & Wellness Products

Pharmacist

There are also several bloggers hosting giveaways for you to try some of these products.  Go check it out!giveaways

 Walgreens Way to Well Fund™

Advertisement

Visit Sponsor's Site

Wednesday, June 15, 2011

Independence Day (July 4th) Table Runner

Sewing tutorial for making a star, rag quilt table runner
I am sort of obsessed with stars; I actually have a metal star that is taller than I am hanging on the wall of my home.  I look for any excuse to include stars on my decor, crafts, or dress.  We made these table runners for Super Saturday a few years ago in the fall using fall colors.  You will spend more time cutting than actually sewing this table runner.  This is a great project for new sewer because there is a lot of forgiveness with this project.

Supplies
  • Gingham fabric (I used 1/2 yard of backing fabric, and bought 1/4 yard each of 3 reds and 3 blues, but I had quite a bit of leftover fabric that I will use for napkins)
  • Scissors
  • Sewing machine & thread
  • Paper & pen or pencil
Directions
  1. Cut 6: 10x12 inch rectangles of backing fabric.
  2. Cut 2 reds, and 1 blue: 10x12 inch rectangles.
  3. Cut 2 blues, and 1 red: 8x10 inch rectangles.
  4. Draw a tall star on a piece of paper.
  5. Cut a star on each of the 8x10 inch rectangles.
  6. Stack two layers of the background fabric, one of the large rectangles and a contrasting star.
  7. Sewing tutorial for making a star, rag quilt table runner
  8. Sew through all four layers 1/4 inch from the edge of the star (on the inside of the star, so you are sewing the star down to the other fabric).
  9. Sewing tutorial for making a star, rag quilt table runner
  10. Repeat steps 6-7 for all three blocks.
  11. Sew two of the blocks together by stacking backs together using a 3/8 inch seam allowance.  Repeat to join last star.
  12. Sew around the edge of the table runner.  Be sure to open seams when sewing over them.
  13. Sewing tutorial for making a star, rag quilt table runner
  14. Snip around the table runner, around each star, along the seams.  Be careful not to snip through your seam.
  15. Sewing tutorial for making a star, rag quilt table runner
  16. When you are finished, it will look like this:
  17. Sewing tutorial for making a star, rag quilt table runner
  18. All you need to do now is wash your table runner in your washing machine, and dry in the dryer.  This will shrink up and crinkle the edges of your stars, seams, and the edges of the table runner.  Make sure you empty the lint trap in your dryer before and after you dry your table runner.

Tuesday, June 14, 2011

Wired-Edge Ribbon Rose - Super Easy!


Sorry for the blurry picture...it's a little difficult to take a steady picture of the top of my own head.
This will take all of a couple minutes to make, and is so easy, it makes a great kid project to adorn hair, clothes, or accessories.

Supplies
  • Wire-edge ribbon (I used 2.25 inch wide ribbon and about 30")
  • Scissors
  • Hot glue gun
  • Fabric, cardboard, or paper to glue flower down on
Directions
  1. Begin by cutting ribbon to length, then poke wire out of the edge.  Pull one side of the wire completely free from the ribbon.  Poke the other side out and begin pulling.
  2. Fold one edge under, pinch in your fingers and glue down.  This creates the center of your rose.
  3. Scootch the ribbon along the wire until it is completely gathered.  It will naturally spiral around the center.
  4. Glue down on scrap of fabric, cardboard, or paper.  Be sure to glue down each layer of the ribbon to ensure rose doesn't bobble.

Monday, June 13, 2011

Simple Hair Bow

Cheer camp is next week, so we are gearing up for what's to come.  This week, I am making bows; this zebra bow is a simple bow and takes only minutes to make.

Supplies
  • Ribbon - I used 1.5 inch wide satin zebra print, and 7/8 inch wide black satin.
  • Glue gun
  • Scissors
  • Hair elastic
  • Fray Check
Directions
  1. Cut a 3 inch length of the black ribbon and tie into a knot.
  2. Cut a 21 inch length of the zebra ribbon and fold like pictured.
  3. Pinch center of the bow and glue the black ribbon to the front.
  4. Place the elastic against the back of the bow and glue the black ribbon ends around the elastic.
  5. Dab fray check in a line along the cut ends of the bow to keep from fraying.

Friday, June 10, 2011

Apple-Blueberry Crisp

Yum...Yum, Yum, Yum.  That just about sums up this delectable dish.  Growing up, one of my favorite deserts was cherry crisp.  My mother would serve it hot with vanilla ice cream; the next morning, we would eat it cold for breakfast (which is what I plan to do with this batch).

I was at the grocery store today and they had a 32 oz. package of blueberries on sale for $5.99.  I don't know about everywhere, but here, that's a steal.  I brought them home and snacked on them all afternoon.  When Adam got home he said, "what are you going to do with all those blueberries?"  Even though I assured him they would all be eaten, he thought I should make a blueberry crisp--shocking from the man who doesn't like sweets.

Ingredients
  • 2 large tart apples
  • 2 (ish) cups of blueberries (I just added handfuls until they looked right)
  • 11 T softened butter
  • 1 C flour
  • 1 C oats
  • 1.5 C brown sugar
  • 2 t cinnamon
  • 2 t nutmeg
Supplies
  • large bowl
  • 9x13 pan
  • mixing spoon
  • knife & cutting board
  • vegetable peeler
Directions
  1. Preheat oven to 375 degrees.
  2. Peel, core, and thinly slice apples.  Spread into pan.
  3. Spread blueberries on top of apples.
  4. Combine all other ingredients and mix until it forms a crumbly mixture.
  5. Spread mixture over blueberries and apples.
  6. Bake for 40 minutes.
  7. Let cool somewhat before eating--you don't want to burn your tongue!

Thursday, June 9, 2011

Monogram Applique with Name Embroidery

I recently made this backpack for my nephew using the Child's Drawstring Backpack Pattern.  The initial and name on the pocket got such rave reviews that I thought I would share with you how to make a pocket like this these two.  You do not need an embroidery machine to make the letter applique.

Materials/Supplies
  • Embroidery hoop
  • Cotton fabric for pocket
  • Micro fleece fabric for applique letter
  • Water soluble stabilizer
  • Thread & sewing machine
  • Scissors
  • If you are making it without an embroidery machine, print a large copy of whichever letter you wish to applique.

Directions
  1. Begin by placing the outer hoop of the embroidery hoop down.
  2. Layer the cotton on top of the hoop with the right side up.
  3. Layer the fleece on top of the cotton with the right side up.
  4. Layer the stabilizer on top of the fleece. (If you are not using an embroidery machine, layer the letter printout)
  5. Hoop all layers together.
  6. Embroider the letter.  (If not using an embroidery machine, stitch in a zigzag stitch with an extremely short stitch length all the way around the letter)
  7. Cut away the excess fleece.
  8. Embroider the name.
  9. Remove the hoop and the stabilizer--my stabilizer mostly tears away, then I use water to remove any remnants.  Cut to desired size and use the envelope method to make the pocket.